Hiển thị các bài đăng có nhãn Misc.. Hiển thị tất cả bài đăng

Thứ Tư, 31 tháng 7, 2013

Oven Fried Crispy Chicken Skin Cracklings... great substitute for bacon.

Crispy Chicken Skin Cracklings... great substitute for bacon. I know. Seriously? Chicken skin cracklings? I never thought I would one day post about such a recipe. Over the years, crispy chicken skin has become more and more popular. You know, sort of like the bacon and maple doughnuts. I mean, who would have thought that bacon would one day be used in in a variety of sweets. But you know, I tried the bacon and maple doughnut ... and it was delicious! It seems that crispy chicken skin has made it as the next "bacon".... maybe it's just a fad. Or maybe it's come and gone already, and I'm still behind times:). However, I've certainly seen creative recipes using chicken skin cracklings. Aside from simply serving them as an appetizer with hot sauce, there's the crispy chicken skin ice cream....  and  ice cream served in crispy chicken skin "cups". Yes, ice cream. No surprise there, because if bacon is used, why not crispy chicken skin? It almost tastes like crispy bacon... salty and crunchy. And it is delicious! I'm not even kidding...

I've always been one that enjoyed eating the crispy chicken skin from baked chicken. So I knew I would probably enjoy the chicken cracklings... actually I was hoping they would be much better:). Baked chicken skin, even fried, isn't always crispy to the point of being called a crackling. So I was excited to take the chicken skin to the crackling stage... this way I'd get rid of most of the fat and remain with all the flavor. 

For some time now, I've been saving my chicken skin. I know... most people would toss it out. Not me. I've been keeping them in the freezer so that one day I could make a big batch of crispy chicken skin:).  The day finally arrived. And all I can say is yum!! They were incredible. So light and crispy. Reminded me of chicharrones... especially the chicken skin pieces that were completely rendered of their fat.

My husband and I ate the chicken skin cracklings as a snack, and enjoyed every bite:). They were gone so quick, that all my plans for using them in a variety of recipes went out the door. I had big plans for them.... for chocolate chip cookies, in chocolate, with popcorn, in tacos, on top of egg sandwiches, and in all sorts of salads.  I guess I'll just have to start saving the skins again:). If you like bacon, you'll love these... at  least it would somewhat make sense:). Hope you enjoy...    

Note: It is important to monitor the chicken skins as they are baking... you don't want them to burn... every oven is different, and chicken skins vary.

You will need:
chicken skin
salt

Directions:
  • Preheat oven to 350 deg F 
  • line a sheet pan with parchment paper
1. Rinse and pat dry the chicken. Sprinkle with salt and place in a single layer in the parchment lined sheet pan.
2. Cover chicken skin with another parchment paper and place another equal size sheet pan on top. Add a couple of heavy oven-proof pots, or a cast iron skillet... I used a couple of small cast iron casserole pans. 
3. Bake for about 40-45 minutes checking halfway, and a few times after that, to ensure chicken skins are not burning. Cook skin until crisp, being careful not to burn... the more fat is rendered, the crispier the crackling.
You can drain the fat that accumulates... a few minutes before the end of the cooking time, and then bake the skins uncovered until nice and crispy. You can likewise keep them covered throughout the whole cooking process. Keeping them covered eliminates splattering of fat all over the oven:). 


Thứ Hai, 22 tháng 4, 2013

Coffee Concentrate... cold brew method without a coffee maker.

Coffee Concentrate(Coffee without a coffee maker)... single cup serving, coffee for a crowd, or used in desserts. A few months ago, our favorite coffee maker gave up on us. And because we love having our daily cup of coffee, we had to  find another coffee maker. In our search for a new coffee maker, we decided to settle on a french press this time around. Even though the french press may look like a simple coffee maker, it makes some outstanding coffee! Love it.  However, there is a drawback with the french press. Our old coffee maker could make a large batch of coffee, and it was especially handy when we had guests. But with the french press, making coffee for a crowd isn't that convenient.

Recently the Kitchn came up with a recipe for making coffee for a large crowd... even without the use of a coffee maker! The technique was rather simple, one that I had known about before. It's allowing coffee grounds to be steeped in water, infused, and strained... yielding a highly concentrated coffee flavored liquid. Yet I had only associated this idea with making iced coffee. Somehow it just never clicked with me that I could also use the concentrate to make a hot cup of coffee. The idea was brilliant! So I set out to make a batch, because I rather liked the idea of having a coffee concentrate that could serve a crowd... or even a single serving for that matter. And I simply loved the idea that you could adjust the strength according to preference.

The coffee concentrate was a real winner! I've really been enjoying the hot coffee... the concentrate produces a smooth tasting cup of coffee.... super quick. Once the concentrate is made, all you have to do is add some boiling water  and you have a great cup of coffee instantly. And of course, you can add milk, sugar, etc to the coffee to make your own a customized version. Loved that you can use the concentrate for other uses as well. It's great for making iced coffee, but it's quite helpful when you want to add a mocha flavor to any baked dessert, ice cream, or frosting. You could even use it in savory dishes, such as chili, stews, sauces. Hope you enjoy...       

You will need:  from the Kitchn

12 oz ground coffee
6 cups cold water

Extra:
boiling water (for hot coffee)
cold water (for iced coffee)
milk/nut milk
sweetened condensed milk for Vietnamese-style coffee, if desired. 
sugar or flavorings of choice

Directions:
1. Place ground coffee in large container/bowl
2. Pour cold water over coffee grounds and stir to completely wet all the coffee. After it sits for a few minutes, you will notice some coffee grinds forming a thin layer on top. Stir the mixture yet again. This will ensure maximum contact of water and grinds. 
3. Cover coffee mixture and allow to "steep" at room temperature for about 24 hours. 
4. Strain coffee concentrate using a fine mesh strainer, cheesecloth, paper towels/coffee liners, etc... the cheesecloth, coffee liners take longer to strain.
I found it best to use a simple fine mesh strainer... it works especially if you are careful not to disturb the coffee grounds that settle on the bottom. I like to press on the grounds to extract as much of the coffee as possible. You might still get some grounds in the concentrate, but it does settle on the  bottom, so when you pour concentrate in the cup, it's mostly free of grounds. However, feel free to use whatever method works for you.
5. Store coffee concentrate in fridge.  
~Use 1:2 ratio( coffee to boiling water) for a cup of coffee. You can easily adjust the ratio to preference. A 1:3 ratio works well, too... especially when you add some milk.   

Thứ Năm, 4 tháng 10, 2012

Homemade Almond Paste... and a Coconut Paste Filling.

Homemade Almond Paste... and a Coconut Paste Filling. Almond paste can be easily found in stores, and the quality is often determined by how smooth  the paste is. There are lots of recipe for making almond paste at home. Some recipes involve making a sugar syrup, adding the syrup to the almonds and then processing it until super smooth... no egg whites involved. Some recipes also add a bit of butter for smoothness and flavor. Other recipes just have you process the almonds and sugar to a smooth consistency and then adding egg whites to combine. I chose to do the latter... simply for its ease of preparation(and because I had some whites to be used up). But whatever recipe you use, it is important that you process the almond paste until you get it as smooth as possible.

The really nice part about making your own almond paste at home is that you can flavor it as you like. Sure, I know an almond paste should have that classic "amaretto" flavor,  but for those who don't like the almond flavor, well, there's an available loophole:)... you can easily just substitute the almond extract with a vanilla extract. And this way, you will be able to use the almond paste in a variety of recipes. Actually you can make a variety of different flavored pastes... orange almond, rose almond, pistachio almond. are just a few. Oh, and it's also cheaper to make the paste at home... plus, it hardly takes any time to whip up a batch. Stores for at least a week in the fridge, and freezes well. 

And because I promised the almond paste recipe when I made the Amadeus cookies , I'm finally posting the recipe. Making the homemade almond paste actually works quite well in conjunction with the Amadeus cookies. Because the cookies require 2 egg yolks only, the whites can then be used to make the almond paste. You can make a double batch of the almond paste, or you can choose to make another nut paste of choice. Since I had some unsweetened shredded coconut available, I chose to make a coconut paste with the extra egg white. Incidentally, I could easily see how the pastes can be formed into balls, or squares and then dipped in chocolate. Yum! Hope you enjoy...      

Note: To make the coconut paste pictured above, substitute the almonds with unsweetened finely shredded coconut(same amount), and add vanilla instead of almond extract...or if you like, a coconut/rum extract.

Tip: If you like to make different flavors: 
For orange-almond paste: add some orange zest( about 1 TBS, or to taste) with a drop or 2 of orange oil or 2 tsps orange flower water. 
For rose-almond: 1-2 tsps rose water, or to taste... and beet juice for color.
For pistachio-almond paste: substitute 1/2 cp of the almonds for 1/2 cup skinless, unsalted pistachios... and add some spinach powder/juice, or matcha( Japanese gree tea) for a greener color.   

You will need: adapted from Taste of Home

1 1/2 cups blanched  slivered almonds
1 1/2 cups confectioners' sugar
1 egg white
1 1/2 teaspoons almond extract( if you don't care for the almond flavor, opt to add a vanilla extract.)
1/4 teaspoon salt


Directions:
1. Place almonds in a food processor; cover and process until smooth. Add the confectioners' sugar, egg white, extract and salt; cover and process until smooth. 
Note: The paste will be a bit soft in the beginning, but as it sits it will firm up a bit more. See top photo(just mixed) , and second photo( as it sat out a bit).  
2. Divide almond paste into portions and wrap well and place in a sealed container. Refrigerate for up to 1 month.... or freeze for up to 3 months.


Thứ Sáu, 8 tháng 4, 2011

Slow-Roasted Tomatoes(Grape or Cherry).... with Garlic and Mint


Slow-Roasted Tomatoes(Grape or Cherry).... with Garlic and Mint.
Some time ago, I was sitting in a waiting room... ready to be called for an eye exam. As usual, I look for cooking magazines that I can occupy myself with for the moment. Not all waiting rooms have cooking magazines, but this one did:). The very top magazine happened to be a copy of the Better Homes and Gardens Magazine. I picked it up and started leafing through it and came across a rather simple but enticing recipe. I quickly scanned over the ingredients and found the recipe to be quite easy to do. Cherry tomatoes slow roasted in olive oil, mint, and garlic. It sounded really delicious to me and the photo was what really won me over. It was full of color and so rustic-looking. The tomatoes were simply served on a slice of toasted bread with a bit of soft goat cheese. Simply served... yet, it stood out. And, before I knew it, I was called for my eye exam. I kept thinking about the recipe. A few days later, I tried it and loved it....
I am not exactly sure if I remembered every detail of the recipe, so this is my adaptation. Also, because I was so eager to try the recipe, I ended up using what I had at home...grape tomatoes, boursin cheese, and some whole grain bagels I had in the freezer. Of course, you can definitely use a nice baguette, ciabatta, etc.... and regular goat cheese. I also think the slow-roasted tomatoes would work just as well on some pasta, as a topping for chicken or fish, a simple side dish... or even on top of a pizza. After the tomatoes are baked, you will notice that some tomato juice is released. The tomato juice combines with the olive oil, making for a wonderful dipping sauce. The tomatoes become soft, so they can easily be smashed with a fork if desired....you'll get a sauce-like consistency.
Slow roasting the tomatoes also brings out the natural sweetness of the tomato.... You can opt for leaving out the balsamic vinegar, but a drizzle works wonders. A different way of using up some cherry or grape tomatoes... without too much work involved. I would definitely prefer using tomatoes from my own garden or a farmer's market...the flavor would be so, so much better.... but store-bought worked fine.
This dish actually reminded me a bit of the garlic and butter roasted mushrooms I posted some time ago...so in case you do not like mushrooms, this might be another option. Feel free to exchange the mint for some basil or even parsley/cilantro. Hope you enjoy....

You will need: inspired by a Better Homes and Gardens magazine

8 oz grape or cherry tomatoes
3 large garlic cloves, sliced
olive oil( I used extra-virgin olive oil)
fresh mint/basil/parsley, to taste
salt and pepper, to taste
drizzle of balsamic vinegar(optional...I enjoyed it with and without)

Directions:
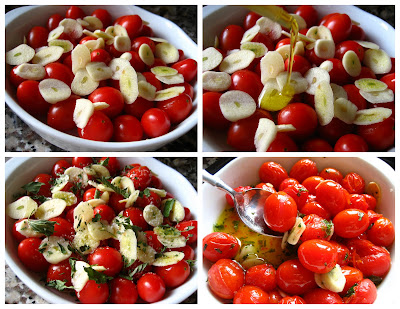
1. In a shallow baking dish, add tomatoes, sliced garlic and enough olive oil to come up at least 1/8th from the bottom of the dish. Add fresh herbs...I used some dried mint from my summer garden.

2. Season with salt and pepper. Toss to coat...placing most of the garlic on the bottom.

3. Bake in a 325 degree oven for 45-50 minutes. I baked mine in the toaster oven and didn't bother to stir the tomatoes...except once after about 10 minutes( to sort of make sure the garlic doesn't burn).

4. Before serving, drizzle a bit of balsamic vinegar for additional depth of flavor (optional).

5. Serve as a topping over toasted bread with goat cheese...or spoon some of it over chicken or fish. Or even simply tossed with some linguine.


Thứ Hai, 24 tháng 1, 2011

Basic Red Chile Sauce...great for enchiladas,burritos, tamales,etc,

.
Basic Red Chile Sauce...great for enchiladas, burritos, tamales, soft tacos, etc,
A couple of months ago my husband and I had the opportunity to visit both of our families who actually live in a different state. We often get invited over for dinner... be it either at my husband's side of the family or mine...many times both. But one evening, my sister and brother-in-law invited us over for dinner before we headed back home. I knew she would go above and beyond when preparing the meal.

So I wasn't surprised when I entered the house and smelled the delicious aromas coming from the kitchen. She had planned a Mexican dinner for us....and most everything was cooked from scratch! I watched as she placed the dishes on the table and before we sat down, the dinner table was filled to the max. There were some beef enchiladas topped with homemade chile verde cheese sauce and a vibrant red chile sauce. At one end of the table, she had placed some warm and soft corn tortillas... neatly stacked in a tortilla warmer. There were plenty of condiments for making your own soft taco...including a sour cream mango sauce, fresh cilantro, onion, and chipotle hot sauce. And that wasn't all...she included some refried black beans, rice, guacamole and various salsas as well. The meal was incredibly good and memories still linger... In any case, I asked her for the red chile sauce recipe as it sounded much simpler than the one( awesome chile sauce) I had posted some time ago. She gladly gave it to me...

The sauce is a great alternative to store-bought enchilada sauce. But it really comes in handy for all sorts of dishes... from seasoning some beef or chicken for soft tacos, to using it for burritos, tamales, taquitos or even in homemade chili. The sauce is great as is, but you can easily add your own spin to it. Try adding some oregano, garlic or onion... or even varying the types of chiles you use. Add a bit of heat or leave it mild.

The recipe is definitely a keeper...made with basic ingredients. The nice thing about it is that you can always store some dried chiles in your pantry and whip up the sauce in no time. I ended up making some quick baked "taquitos" as I had some shredded beef I wanted to use....later on I made some simple beef burritos which I topped with some of the red chile sauce. But feel free to use the sauce however you like. Hope you enjoy...
Note:You can see a list of dried chiles and substitutions here...Dried Chiles

You will need: you will probably get about 4 cups(+/-) of sauce

15 dried mild red chile pods(Guajillo, New Mexico, California or Pasilla chiles)*
4-5 cups stock( or water, though I use homemade chicken stock )
~~~~~
2 TBS oil
2 TBS flour
1 TBS cumin
1 TBS salt( or to taste... do lower(or omit) the amount of salt, if you are using broth)
1 TBS tomato paste( optional...I don't use)
* I used 13 mild California chiles, a Peruvian Aji Panca, and an Ancho, just to vary the flavor....I couldn't find the guajillo, which I preferred.

Directions:
1. Wash chiles, remove stems( if you want, the seeds as well) and place in a stock pot.
2. Add stock( or water , if using) and bring to boil.
3. Bring to boil, lower heat and cook for about 15 minutes.
4. Let cool and place everything in a blender.
5. Blend till smooth and strain through sieve(I omit the straining).
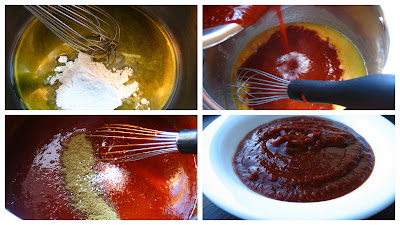
6. Heat oil in a saucepan and whisk in the flour. Cook on high till flour browns a bit, but do not let it burn.
7. Stir in red chile sauce, cumin, salt and tomato paste(if using).
8. Reduce heat and simmer on low for 5- 10 minutes( you might need to cover the pot, as the sauce can splatter a bit...at least that is what I experienced:)).
Making a few "taquitos" with a bit of the chile sauce: a quick idea, though you can substitute the beef with shredded chicken ...or use the sauce to top off burritos, make tamales, etc.
I had some shredded beef that I cooked in a pressure cooker with some onion, carrots, garlic and spices for about 45 minutes or so. I shredded the meat and placed it in the food processor. I used a few short pulses to process the meat a tiny bit more. I added some chile sauce to some of the meat ... to taste.
I ended up brushing a soft-taco sized tortilla with a bit of olive oil ...and cut it in 4 pieces( since I found that rolling the whole tortilla was a bit too thick). I decided to make some small appetizer-size baked "taquitos" by placing about a tablespoon of seasoned beef on a quarter of a flour tortilla and topping the beef with some queso fresco cheese. I then rolled it up securing the "taquitos"( 2 at a time) with a toothpick. Baked them at 350 or so until golden brown... being careful to watch them, as the edges tend to want to burn. Served it with guacamole. A nice change from the deep-fried versions.
The "taquitos" can easily be assembled, frozen, and baked later.

Another simple way of using the red chile sauce is over any burrito...beef, chicken or bean. Add a few tablespoons of sauce, some shredded cheese and heat till cheese is melted. Top with cilantro and white onion ...and for extra heat add a few slices of fresh jalapeno.

Thứ Tư, 13 tháng 10, 2010

Fresh Homemade Ricotta....and Bruschetta Recipe


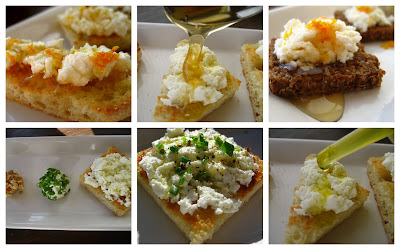
Fresh Homemade Ricotta and a Bruschetta recipe.... Have you ever had fresh ricotta...not the store-bought, but the homemade kind? Some time ago, a recent commenter, asked me if I had ever made fresh ricotta before...Ok, so I've been meaning to make ricotta for a long time now, but somehow I just just put it off, trying out other recipes such as paneer, labneh, etc. But when Craig brought it to my attention, I knew I had put it off for too long. I decided it was time to put it on the top of my to-do list. The very top. I needed to make it. So I searched for a recipe and decided to make Mario Batali's version, just because it was SO easy to do....and well, it was also a bit more decadent with the addition of the half and half:). Wow, was it simple and incredibly delicious! It was so quick to make, that it was unbelievable...and it tasted so much better than the store-bought kind. If you've made paneer before, this is very similar... actually, this is even easier. I really liked it. Liked it a lot. There are other versions of homemade ricotta out there...where the ricotta is drained and allowed to sit for a few hours in a cozy environment. I prefer the quicker version... probably because I get to consume it earlier:).
The ricotta is wonderful in a variety of dishes...sweet or savory. For a sweet version, you may want to add a bit of fresh cream to make it creamier. I love the ability to make the ricotta softer or firmer. It all depends how it will be used. This time around, I chose to use it simply as an appetizer/dessert. It would be wonderful to use the ricotta to make some cheese stuffed shells, lasagna, etc...or use it wherever ricotta is called for. Somehow, I really prefer it fresh, with a drizzle of honey and a sprinkle of grated orange peel....you could also top it with some chopped pecans, walnuts, etc. That combination can't be beat... well, just because almost everything tastes better with honey:). Anyway, if you've never tried making homemade ricotta, you just might want to try it. I think you will like it. We did. Hope you enjoy...

You will need: adapted from Mario Batali ...Will yield about a cup and a half or so of ricotta. You can easily double the recipe.

2 cups whole milk( do not use low fat)
1 cup half-half
2 TBS white vinegar
generous pinch of salt (less if doing for dessert, more if for savory)

Directions:
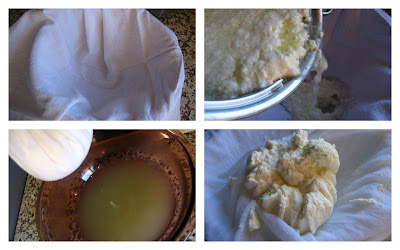
Set a cheesecloth/flour sack/ even a sturdy paper towel over a large bowl.
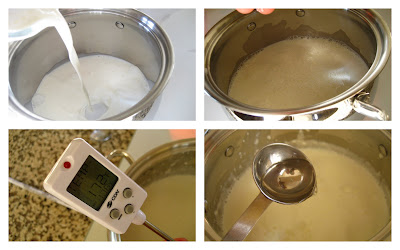
In a stainless steel pot, add the milk, half and half, and salt. Bring to a full boil...I brought mine to to about 176 deg. Take the milk off the heat immediately and add the vinegar.
Stir until curds form and the whey has separated. Pour the curds and whey in the prepared cheesecloth lined bowl. Gather the ends and suspend to drain for about 15 minutes. The longer you let it drain, the firmer it will be. The less you let it drain, the softer it will be.
Serve immediately or refrigerate for a few days. Use in a variety of dishes.
Savory: Try rubbing the toasted bread with a garlic clove and topping it with some fresh ricotta and sprinkling some fresh sea salt, some good olive oil and any fresh herbs/chives along with a touch of pepper. I love adding some sundried tomatoes...or tapenade, etc. The variations are endless...

The ultimate combination...Ricotta, honey and orange peel. YUM!


Bruschetta with Fresh Ricotta: adapted from Food52. An interesting combination ...but definitely worth a try. I really liked it.

You will need:
toasted bread slices
a garlic clove,cut in half( this is optional, though it isn't strong, but I liked it)
fresh ricotta
salt
olive oil
honey
orange zest

Directions:

1. Rub cut garlic clove on one side of the toasted bread.
2. Spread a bit of ricotta on top of the toasted bread.
3. Sprinkle with a pinch of salt.
4. Drizzle with some olive oil.
5. Drizzle with a bit of honey.
6. Top with a finely grated orange peel.

Variation: skip the garlic and olive oil and simply enjoy it with some honey and orange peel.

Thứ Hai, 23 tháng 8, 2010

Pickled Carrots and Daikon Radish...


Pickled Carrots and Daikon Radish...This recipe is super easy to make and doubles up as a side dish or as accompaniment to any sandwich. Sometimes I have carrots in my vegetable drawer that need to be used. This is a great dish to make and to have on hand for all sorts of dishes. I love the fact that I can make it ahead use it throughout the week....the flavor does intensify the longer it sits.
You can make just a carrot pickle ...or you can combine it with some daikon radish. The pickle is great on various sandwiches (Vietnamese Banh Mi, Asian flavored burgers, Falafel pita sandwich, etc). I'll be sharing with you 2 types of sandwiches that I made using this pickle....coming soon. But there are many uses...just be creative. It's so great to be able to use something other than lettuce on your sandwich....using pickled vegetables brings in a ton of flavor and sure makes for a different sort of sandwich. You can make the pickle spicy or skip the hot peppers altogether. And, if you like your pickle on the sweeter side, add a bit more sugar. Of course, you can easily add various herbs to make it different. Sometimes, I like it simple. Hope you enjoy....

You will need: You can easily double or triple...
1/2 lb daikon radish and carrots, julienned( I used 2 carrots and a 4 inch daikon radish)*
1 1/2 cups warm water
3 TBS white vinegar( I used white wine vinegar...you can also use rice vinegar)
1 TBS kosher salt
1 TBS sugar
1 garlic, grated finely( I used my microplane)
chile peppers( optional)
* you can do just carrots or just radish , if you like

Directions:

1. Julienne the carrots and daikon radish. I like to cut long slices on a bias and then cut in strips.
2. Place the carrots and radish in a clean jar.
3. In a bowl add water, vinegar, salt , sugar and grated garlic. Stir until the salt and sugar have dissolved.
4. Pour over carrots and radish.
5. Refrigerate for a few hours ...preferably overnight.
6. Serve with Vietnamese Banh Mi sandwich, falafel sandwich, as a side dish, etc.

Thứ Năm, 29 tháng 7, 2010

Marinated Yoghurt Cheese Balls(Labneh)...

.
Marinated Yoghurt Cheese Balls(Labneh)...a great Appetizer. I really enjoyed making this cheese as it wasn't hard to make at all. It did take some patience on my part. I don't know why, but I tend to get excited when I make homemade cheese or yoghurt.... or kefir for that matter. I guess I feel the results are worth it. This recipe, however, uses store-bought yoghurt... though I am sure you can make your own yoghurt. It would take a bit more time as it would involve a 2 step process...making the yoghurt and then making the cheese. This time around, I took the easy way out and used the ready-made yoghurt. I loved using the thicker Greek-style yoghurt...it has less whey and I think you get more cheese out of it. It was really simple to make and yet the outcome was so elegant and tasty. What I like about making my own marinated cheese is that I can easily vary the herbs and seasonings. I loved this delicious yoghurt cheese. The texture is similar to chevre... it has this tangy sort of flavor. My husband actually thought it was goat cheese:)... We loved spreading the cheese on toasted bread and drizzling some of the seasoned oil. It really was delicious. And, to think that I made it...that was even more rewarding!
Strained yoghurt cheese or Labneh is very popular in the Middle-Eastern cuisine. It is often eaten for breakfast with olive oil, bread, olives and other cheeses...The olive oil really enhances the flavor of the cheese....so, I always use some good extra-virgin olive oil. The cheese can easily be a part of a mezze platter or even used as a sandwich spread. Some people prefer to let the strained yoghurt dry out a bit before seasoning it with various herbs and storing it in olive oil....
This marinated cheese can be a great homemade hostess gift. It's also a great appetizer that you can bring to your next gathering....accompanied by various, crackers, crostini, pita wedges, etc. Do feel free to adjust herbs to your preference. Hope you enjoy...

You will need:

16-20 oz thick Greek-style yoghurt ( I used Fage)
kosher salt to taste(I used a pinch...and added some to the oil)

Seasonings to taste: can use any or a combination of the following fresh or dried
thyme
basil*
oregano
fennel
cilantro*
caraway
chile flakes*
dried onion
chives
smoked paprika*
garlic
salt(if needed...since I didn't use too much in the cheese, I added some to the oil)*
*what I used this time around

Oil:
Extra-virgin olive oil

Directions:
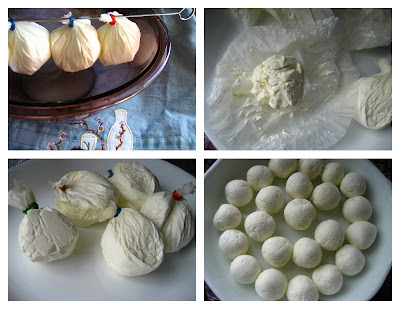
Place yoghurt in a bowl with salt and stir to combine. Use a muslin cloth or coffee filters. Place yoghurt in center. If using coffee filters, divide yoghurt in several filters then gather up muslin/filter sides and tie with string/rubber band.
You can suspend the ball over a bowl by tying the string to a wooden spoon or if using coffee filters, slip a kebob skewer through the rubber band and suspend on top of a large bowl, allowing the ball to hang down. Leave to drain in the fridge for 3 days. Use the whey that has drained out in other dishes....I used some of the whey when I made some hummus, or in mashed potatoes. Remove the yoghurt cheese balls to a plate and form small balls of cheese (walnut or smaller size. Place on a flat plate.
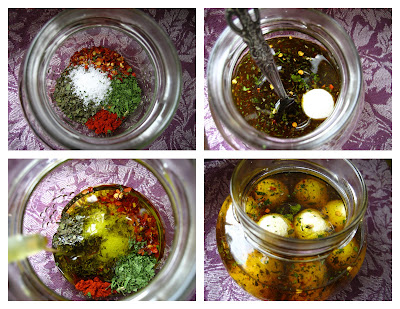
You can refrigerate for 3 hours to dry out, if you like... I didn't. To a sterilized jar, add herbs/seasonings and most of the oil. Mix. Add the yoghurt balls and enough olive oil to cover.
Since most of the seasoning has the tendency to settle at the bottom , I like to "roll" the closed jar gently or turn upside down a few times to redistribute the seasonings. Leave to marinate for about 24 hours. Keep for up to 1 week or so.
SERVE:
Serve alongside a mezze platter with olives, roasted bell peppers, hummus, baba ganoush, etc. and some warm pita bread.
OR
Serve as a tasty and classy appetizer with toasted bread/baguettes/crackers or with pita bread. Drizzle with some of the seasoned oil for even more flavor.

What to do with all the leftover oil?:
Use it to dress some boiled pasta dish...linguine, penne. Use it when sauteeing some shrimp or chicken...scampi style.
Use a bit of it in salad dressings. Try adding some balsamic vinegar and using it as a dip for crusty bread...yet, another appetizer.

Thứ Năm, 24 tháng 6, 2010

Crisp Rosemary and Sesame Flatbread....made into Crackers


Crisp Rosemary Sesame Flatbread....made into Crackers. I hardly ever buy crackers anymore...for some reason I find they taste much better homemade...plus, I know exactly what goes in them. Making the crackers at home also allows you to play around with seasoning. You can add various spices, nuts and herbs to your liking. This actual recipe comes from a 2008 Gourmet Magazine issue, that is also posted on Epicurious. I was actually inspired to make it after I saw it on several blogs....including Smitten Kitchen. It seemed that everyone loved this simple-to-make flatbread/cracker. So, I decided to make it. When making crackers, I usually like to make my Parmesan-Sesame crackers or the Goldfish crackers. But this sounded easy to do, plus I had plenty of fresh rosemary in my garden. The crackers are easy to make, as long as you make them in large discs(tortilla style). If you decide to make them in assorted shapes, it will take you a bit longer, just because of all the cutting and re-rolling of the dough. But I think they look cuter....especially the flowers:). I did manage to make some "football" shapes so that it wouldn't be all girlie:). But however you make them, these crackers are delicious. It is important to roll the dough pretty thin... Try to keep the edges of the rolled out cracker the same thickness(or thinness) as the middle part. Otherwise, the outside edge will brown quicker than the middle. These are just tips...it really isn't that complicated.
The recipe uses heavy cookie sheets to bake the crackers. I don't know about your cookie sheets, but mine always bend at high temps. They make this loud popping noise that always scares me. So, I used my baking stone instead:)...
I decided to add a few other ingredients to mine, just because I wanted to bring in additional flavor...and to make the crackers my own. I added some dried onion, black and white sesame seeds and rosemary. They were really flavorful...I loved the green specks of rosemary peeking through. The black sesame seeds really stood out against the light colored cracker. You can also use poppy seeds instead of the black sesame seeds....or simply follow the original recipe. We loved the crackers plain...and also with some hummus. They were gone before we knew it:). Hope you enjoy...

You will need: adapted from Epicurious
1 3/4 cups unbleached all-purpose flour
2 tsps-1 TBS chopped rosemary
1 teaspoon baking powder
3/4 teaspoon salt
1/2 cup water
1 TBS dried onion flakes~optional
1 TBS sesame( you can use black and white)~optional
1/3 cup olive oil

Directions:
Preheat oven to 450°F with a heavy baking sheet(or pizza stone~which is what I used) on rack in middle.
In a medium bowl, add the flour, chopped rosemary, sesame seeds(if using), dried onion(if using), baking powder, and salt. Make a well in center. Add the water and and then add the oil. Stir in the flour using a wooden spoon until a dough forms and all the flour is incorporated. Place the dough on a countertop, and knead it gently 4 or 5 times.
Divide dough into 3 pieces. Roll out 1 piece on a sheet of parchment paper into a 10-inch round Don't worry about making a perfect circle...it can be rustic. Just make sure the dough is thin...very thin. If the dough is not thin it will be "bready". Keep the remaining pieces covered with plastic wrap.
Now I made one round piece, but as always, I like to make it harder on myself by changing a few things:). I decided to make a few different shapes...flower, football shapes, round shapes, big and small triangles.... I liked the flower and the long triangles the best. The long triangles will definitely make a statement in a bread basket...for some reason I didn't take a good picture of those.
Slide round cracker dough~or shapes~with the parchment paper onto preheated baking sheet(or stone) and bake until pale golden and browned in spots, 8 to 10 minutes. I noticed the time was different on the pizza stone...it took only about 4-6 minutes. It is important to watch the time as the crackers can burn easily...every oven is different, so do keep a watchful eye.
Transfer flatbread to a rack to cool, then make 2 more rounds or more shapes. Break the round flatbread into pieces. Serve with various dips, hummus, or eat as a snack.


Thứ Hai, 5 tháng 4, 2010

Flour Tortillas...


Flour Tortillas....There's something to be said about homemade tortillas... especially warm. Even better...straight from the skillet~! Homemade goodness.... The tortillas taste incredibly delicious with some melted spicy pepper jack cheese sandwiched in between...or try any other cheese you prefer. If you don't want to use any cheese, use a bean dip instead...even healthier. Since they are relatively easy to make, they can be kneaded and cooked in less than an hour. The one thing I like about making them at home, is that you can season them as you like. You can make the tortillas all whole wheat, partial whole wheat, or even all white flour. For this post I made the partial whole wheat flour tortillas. You can add additional flavor...such as adding some chipotle pepper powder, onion powder, etc. Try making some that are spinach flavored, sundried tomato flavored, basil flavored, etc....
I like to make all sorts of things with the tortillas...from the classic quesadilla, to burritos and tacos. The tortillas are most wonderful when filled with eggs for breakfast and topped with some fresh pico de gallo salsa. Regardless of how you use them, I think it is great to be able to make them at home....especially when you don't want to run to the store to buy some. There are all sorts of recipes out there for tortillas...the authentic ones use lard instead of oil. The lard definitely gives the tortillas much better flavor, but I opt for a healthier alternative by using olive oil. You can use vegetable oil or even some melted butter, if you prefer. The amount of oil used in the recipe can be adjusted...you can add a bit more if you like, but I found it to be just right. Also, make sure your water is warm...this will help keep the tortillas to be more tender and less chewy. The water amount can be adjusted a bit as well...I noticed the whole wheat version needed about 1-2 TBS more of water. You don't want your dough to be dry. Maybe one day you will give this recipe a try:). Hope you enjoy....
Tip: If you don't care for using whole wheat...you might like to try my Texas-Style tortillas. Simply the best!

Partial Whole Wheat Flour Tortillas:
Inspired by the The Cooking Photographer
1 cup whole wheat flour
1 cup all-purpose flour
3 Tablespoons oil (I use olive oil...but you can also use melted butter)
½ teaspoon salt
2/3 cup + 1-2 TBS warm water
chipotle powder,to taste (optional)
onion powder, to taste (optional)
***
additions chopped spinach, sundried tomatoes(optional)

White Flour Tortillas
2 cup unbleached all-purpose flour
3 Tablespoons oil (I use olive oil...but you can also use melted butter)
½ teaspoon salt
2/3 cup warm water
chipotle powder,to taste (optional)
onion powder, to taste (optional)

Directions:
In a food processor add the flour, oil or butter, any optional seasoning and salt. Process for several seconds. Then add the warm water and process until a ball forms. Add additional water, if needed, little by little.
Remove the dough from the food processor and knead it several times. Place the dough in a small bowl and cover with plastic wrap. Let the dough rest on the counter for at least 30 minutes.
Knead the dough a couple times and divide into 10 or 12 balls.
Keep them covered as you work with each one..Take one ball of dough and roll it out in a circle... as thin or as thick as you like. I like to keep my countertop slightly oiled.
Place tortilla on a preheated skillet...Heat it up on medium heat and lower it to med/low as you cook the tortillas. Place a flour tortilla in the skillet and cook for 30 seconds to 1 minute or until the top forms blisters or is dry to the touch. You don't want to overcook the tortillas as they will get brittle. Turn over and cook for an additional 30 seconds or so.
Place on a plate and keep covered. You can also freeze the flour tortillas...but not for too long, as they can get brittle

Thứ Tư, 17 tháng 3, 2010

Cilantro Oil

Cilantro Oil....
I thought I would share with you a really quick and tasty oil.... cilantro oil. Of course, you can also use parsley, basil, mint, etc. This oil keeps for 2 weeks in the fridge but can get darker in color as it sits. Many recipes has you throw away the solids, after straining. I like to use the solids (usually that day) to marinate some sort of meat. It gives wonderful flavor, so why throw it away? Mix it with some seasoning, lime juice, garlic and you got yourself some amazing marinade! The cilantro oil is perfect for drizzling over pasta, pizza, quesadillas,....it can also be drizzled on top of cream soups, used as a salad dressing, as a marinade, etc... There are many recipes out there, and amounts really are up to you. You can put more oil, add more cilantro, add some garlic, etc. The oil itself is bland without salt, so add a pinch or two. Taste it and adjust to your liking. It will come alive! For this post, I blanched the cilantro in some boiling water for a few seconds, you can probably skip that step if you like. Also, if you don't really want to go through all that trouble of straining it, use it as a base for a marinade instead...season it of course. Here are a few links on cilantro oil...Recipezaar, Epicurious , CdKitchen and Emeril Lagasse and a couple of links on the variations of Cilantro Oil... Green-Chile Cilantro Oil or Garlic Cilantro Oil
Hope you enjoy...

You will need:

1 bunch cilantro
water
1/2-1 cup oil
salt/pepper to taste

Directions:
In a pot add some water. Bring to a boil. Add cilantro bunch . Blanch for a few seconds.

Remove and place in cold water. Drain cilantro and pat dry. Place cilantro in a food processor or blender. Pulse a few seconds. Turn on and drizzle oil until smooth. Let sit for a few hours.
The oil will separate and come to the top. Drain oil through a fine strainer(trying not to disturb the solids at the bottom). You can also strain it over a coffee filter...it might take a while to filter, but you will get a nice clean oil. Season oil with salt. It brings out the flavor. Use the solids for a marinade....
You can try adding some garlic, salt, pepper, and lime juice.