Hiển thị các bài đăng có nhãn Grains. Hiển thị tất cả bài đăng

Thứ Tư, 28 tháng 8, 2013

Grilled Harissa Chicken... with millet and tomato salad.

Grilled Harissa Chicken... with millet and tomato salad. Leftover chicken can be sliced and  used as lunchmeat. I'm always thrilled to add another chicken recipe to my collection of simple and delicious chicken meals. I'll admit these aren't the best pictures... was hurrying up the dish, and really didn't take my time to properly heat up the grill, therefore the lack of good grill marks on the chicken. On the other hand, the chicken came out so moist and quite delicious:). In any case, this recipe came about one day when I decided to do something different with the defrosted chicken breasts I had on hand. Knowing we wouldn't eat them all at one sitting, I immediately thought of grilling them. Grilled chicken always tastes better, and it makes for good leftovers. 

I'll be honest, sometimes I take the easy route and simply season the chicken with some olive oil, grated fresh garlic, salt and pepper... sometimes I'll add some chile flakes or some paprika, be it smoked or sweet. This time though, I wanted to bring in a slightly different flavor. Why, with all the spices I had in my pantry, I should be able to come up with a good spice mix:). I decided to go with a harissa marinade for the chicken. Not only would it be different, but I'd use some spices that both my husband and I love. After looking over some harissa chicken recipes online, I settled on one from Food and Wine as the inspiration for my version. And even though I ended up using spices and ingredients I had in the house, the result was still delicious!

My intention was to serve the harissa chicken atop a tomato salad, but I quickly changed my plan when I noticed a full bag of millet in my fridge. I knew it wouldn't take much to cook the millet, plus  it would "stretch" the chicken meal even further and bring in some added nutrients. The millet would also help to absorb some of the tomato juices from the salad. But I loved the combination and found a new dish to make again. 

I'm thinking next time, to change things up a bit, I'd substitute the millet for other grains... even couscous. And because we didn't eat all the chicken breasts, I had some leftover chicken for the following day. We sort of finished the salad and millet(millet is best the same day it's made) for dinner. The next day I decided to thinly slice the grilled chicken breasts and made a sandwich for my husband. He absolutely loved it. Sometimes I wonder why I still buy deli meats:). 

The flavor on the chicken isn't overpowering, so it works to use it in sandwiches. I think when I want some lunch-meat, I'll just make the chicken without the salad. And it's a cheaper alternative to the store-bought lunch-meat... it actually tastes much better. In any case, if you're looking to try a different chicken dish, you might want to give this recipe a try(or the original from Food and Wine).  Even if you make the chicken alone, to use as lunch-meat, it would still be worth it. Hope you enjoy...       

You will need:

6 half boneless chicken breasts, patted dry

Harissa Marinade:

Dry spice mix:
1 tsp smoked paprika
1 tsp chipotle powder
1 TBS sweet paprika
2 tsps kosher salt, or to taste
1 tsp dried minced garlic
1 tsp caraway powder
1 tsp cumin powder
Extra:
2-4 TBS olive oil

Millet:
1 cup dried millet
2 cups water(or stock)
1 TBS butter
salt, to taste

Tomato Salad:
1 1/2-2 cups grape tomatoes, halved
1/4  red onion, thinly sliced
2 large radishes, optional(or use a cucumber)
lemon/lime juice or vinegar
olive oil
salt

Topping:
chopped fresh cilantro

Directions:
1. Mix the dry harissa spice mixture  until thoroughly combined. 
2. Place chicken breasts on a flat plate
3. Sprinkle the dry spice on both sides of each chicken piece, making sure to use all of the spice. 
4. Drizzle 2-4 TBS olive oil over the chicken pieces and using your hands rub the oil all over each piece. You can adjust the oil amount until you get a moist thin paste one each of the chicken pieces.  
5. Wrap the plate with plastic wrap or place chicken in a large plastic bag. Refrigerate overnight. 
When Ready to Grill:
1. Remove chicken from fridge and allow to sit on counter for about 20 minutes or so...
2. In the meantime, cook millet, make salad and preheat grill on high.

Cook Millet: for a grain-free meal, opt to skip this and make the tomato salad only, though you may need to double the salad. 
Tip: You can cook quinoa instead of millet, or even rice will work great. Couscous is another alternative...

1.  Add millet to a medium dry saucepan. On medium heat,  toast the raw millet for 4-5 minutes or until it turns a rich golden brown, stirring often. Be careful not to burn. 
2. Pour in water/stock and salt... you may not need too much salt especially if using stock. Stir the millet.
3. Increase the heat to high and bring the mixture to a boil.
4. Lower the heat to a simmer, add the butter and cover pot. Simmer until the grains absorb most of the water...  about 15-18 minutes. Do not lift lid off during cooking, and avoid stirring too much as it will break up the grains and make it mushy.
5. Remove pot from heat and let the millet stand covered to absorb all the liquid.... for 15 or so minutes.
6. Remove cover and fluff the millet using a fork. Adjust seasoning and add a bit more butter, if you like... serve warm.

Make Tomato Salad: if you like more salad, opt to double recipe
1. Cut tomatoes in half, slice onion and radishes( if using) and place in a bowl. 
2. Drizzle tomato mix with plenty of olive oil, season with salt and squeeze a bit of lemon/lime juice over it.

Grill Harissa Chicken:
1. If the chicken is too dry, add a bit of olive oil and rub it all over. This will ensure the chicken will not stick to the hot grill.
2. Place chicken on hot grill. Lower heat to medium and cook chicken on one side for about 3-5 minutes. Flip over and continue to grill the second side until chicken just cooked. I like to slightly undercook the chicken... the chicken will continue to cook as it sits to rest. Overcooking will make the chicken dry, and that's not a good thing:)  

Assemble Dish: family style
1.  Place fluffed millet on a large plate, Spoon tomato salad around the millet and sprinkle with chopped cilantro. 
2. Place the grilled chicken breasts on top of the millet/tomato salad... serve with lime wedges, if desired or yoghurt sauce.  

Cold leftover harissa chicken sliced thinly on a bias makes wonderful lunchmeat!

Thứ Ba, 14 tháng 5, 2013

Flax Seed Crackers... Gluten-Free/Egg-Free/Flour-less.

Flax Seed Crackers... Gluten-Free/Egg-Free/Flour-less. Sorry, I'm back to making crackers again:). But ever since I made the chia seed crackers, I knew I wanted to try the flax seed version. This time around I chose to sort of  "get rid" of some seeds, grain and nuts I had in my fridge. I often manage to buy certain seeds, nuts or grains  for specific recipes... use some of them, but then sort of "forget" about the rest. Oh, I know they are there,  because I see them every time I open my fridge:). Nuts normally aren't a problem, as we like to munch on them whenever we look for  a snack. Sunflower seeds tend to be used in salads... and as of recent, for making sunflower seed "flour" to use in gluten-free recipes. Made some gluten-free french macarons using sunflower seed flour and it works really well.... in case you are interested in trying it:). In any case,  flax seeds, chia seeds and millet sort of get forgotten. So this time around my intention was to "clear" out my fridge... got all my little containers  with various seeds, nuts, and millet to make these crackers.

The resulting crackers were delicious! Even though this batch of crackers weren't grain-free or nut- free(like the chia crackers), I felt they had more character:). The flax seeds and millet provided quite a bit of extra texture... and the almonds gave the crackers added flavor. You'll have to overlook the fact that some of the seeds can get stuck in your teeth:). 

Because I SO loved the flavor of  onion in the chia seed crackers, I decided to add it to these crackers as well.  Personally, I think the onion flavor is what really elevates the crackers and makes them unique. I like to eat the crackers as a snack, sort of curbs my appetite for chips.... even my husband likes them:). They go wonderfully well with various cheeses and dips. So if you you are looking for yet another cracker recipe that's a bit different, you might want to give this recipe a try. Hope you enjoy...

Note: If  you notice the cracker is not crisp when you break it in pieces, it probably wasn't dried enough in the initial baking process... so all you'll need to do, is to bake it for another few minutes until the crackers are crisp. It can be anywhere from 10-20 extra minutes.  

You will need:

1 cup flax seeds(I used golden)
1 cup water
1 cup sunflower seeds( I used 1/2 cup raw +1/2 cup roasted)
1/3 cup millet
2/3 cup raw sliced almonds
2 tsps  dried onion powder 
chile flakes to taste, optional
11/4 tsp kosher salt, or to taste

Directions:
1. In a large bowl, add all ingredients. Mix well to combine evenly. Allow to sit for 10 minutes or more ... until mixture "clumps" up and forms a thick "batter". 
At this point, you can proceed to bake the crackers, or you could let the cracker mixture soak for 2 hours or so... which is what I ended up doing. The mixture does get drier, but it still works.
  • Preheat oven to 170 deg F
2. Line a large cookie sheet with parchment paper, and place cracker mixture in center. With wet or oiled hands press the mixture into a thin even layer... about 1/4 inch thick. You will need to wet your hands often, as the mixture can be quite sticky.
3.  Place pan in preheated oven and bake for 60-80 minutes. Turn cracker sheet over and bake an additional 60-80 minutes... or until you notice the cracker sheet is no longer soft in the center. 
When turning the cracker sheet over, you might find it helpful to use another baking sheet of the same size to help you turn it over without breaking in pieces.
4. Turn oven off and allow cracker sheet to dry further in the oven with the residual heat. I leave mine overnight... 
I placed a range in baking time, because this depends on how thick or thin the cracker was spread... and all ovens are different. Mine took about 70 minutes on each side.

Thứ Hai, 28 tháng 11, 2011

Crusty 10-Grain Sourdough Bread Loaves... using a starter.


Crusty 10-Grain Sourdough Bread Loaves... It was one of those days when I needed a break... what better way than to relax in the kitchen:). Love to bring out the flour and bake bread.
I confess I wasn't planning on making this particular bread... nor posting it. It was just that I really needed to use my starter as I was going on vacation for a few weeks... wanted to use most of it, if I could. I hoped the rest of the sourdough starter would somehow survive in the back of the fridge until I came back.
As I looked at my starter sitting on the counter from the night before, all fed and ready to be used, I thought of all the possible ways I could use it. I could of course make bread. But what kind of bread? I suppose the possibilities were endless... rolls would be easy to do, as well as flatbreads, or pizza doughs... even sweet breads could be made. But you see, I had this 10-grain hot cereal mix sitting in my fridge... could I possibly use it? It would be fun to come up with a new recipe. I really wanted to experiment... didn't want to rely on a specific recipe from a bread book. Sort of wanted to be on my own...
Truth be told, I wasn't expecting a stellar end-product... neither was I expecting something fabulous. At least most times when I experiment, the end result isn't always something to be proud of. But I knew the worst that could happen was to have some really dense flat breads with a crumbly, coarse crumb. I wasn't really worried as I could always turn it into breadcrumbs:)... but deep down I wanted my loaves to be successful. So I forged ahead and combined the ideas/techniques I learned from the Almost No Knead Bread, the Multigrain Sandwich Bread, and the Sourdough Walnut Bread to bake bread.
As I started getting all my ingredients out, I decided to get a pen and paper, along with my camera:)... just in case the loaves would be a success. I've made plenty of other recipes where I didn't write down measurements... and wished I had! Needless to say, I was thrilled with the final result....the bread loaves were fantastic! I could hardly wait to cut through it and see how the crumb was... springy, soft and well, you can see it in the photos. The crust was nice and crispy with a nice crunch. Wonderful for making hot or cold sandwiches, or next to a soup or saucy entree... or simply topped with some butter and jam. Loved the sunflower seeds and the various grains throughout the bread. Interestingly enough, I was planning on adding a bit more whole wheat flour to the dough...but found out last minute, that I only had 1 cup of spelt flour in the house. Ended up making the bread with what I had in the house. Next time, I'll add more whole wheat flour.
Years ago, I received quite a few Corningware casserole dishes as wedding gifts... at the time, I thought, "When would I ever use them all?".... How thankful I am for those dishes! They really come in handy... especially when baking bread. I know other folks use dutch ovens for baking bread, but I like to use the Corningware. I can make smaller loaves, and freeze some for later. Plus, the bread gets just the right kind of crust...golden and not too crusty.
In any case, I am posting the recipe for my own personal reference...and for those of you who care to try it. By the way, the sourdough starter survived in the back of the fridge until I came back... ended up making this bread again, except a sundried tomato/basil version. Hope you enjoy...

Note: While I used a 10-Grain Hot Cereal( Bob's Red Mill), you can easily use a 7 or 8-Grain Hot cereal.
Tip: You can use any baking dish/es that are oven-proof to at least 450 deg F(just decrease the pre-heating temp).... the lids must be oven-proof as well.

You will need:

2 1/4 cups sourdough starter, fed from the night before
1 cup 10-grain cereal
2 cups boiling water
2 1/2 tsps kosher salt
2 TBS honey
1/4 cup olive oil( or meted butter)
1 cup whole grain spelt flour
3 1/2-4 cups bread flour, or as needed
1/2 cup roasted sunflower seeds( or other seeds of choice)

Directions:
1. In a medium pot, boil water, remove from heat and add 10-grain cereal, honey, and oil,(or butter if using). Mix and set aside until mixture reaches 120 deg F. I just stir the mixture continuously so that I speed the cooling.

2. To a mixing bowl(with a kneading hook), add the sourdough starter, salt, the cooled 10-Grain mixture, the spelt flour, and 3 1/2 cups bread flour.

3. Knead mixture using a dough hook for 5-6 minutes...at this time check to see that the dough isn't overly wet...it should release from the sides of the bowl as it is kneading, but stick to the bottom. The dough will start out very sticky, then gradually start to come away from the sides of the bowl. You can stop midway through, scraping the sticky dough off the sides, and then continue kneading. The dough should climb the hook for the most part. If it is still sticking to the sides, continue adding more flour, 1 TBS at a time, until the dough releases from the sides... I needed the whole 4 cups. But be careful as you don't want to add too much flour.

4. Continue kneading for an additional 3-4 minutes for a total of 9- 10 minutes. During the last minute of kneading, add the sunflower seeds and knead to combine.
Note: The dough is still a tacky sort of dough, expect it to stick to the sides as you stop the mixer from kneading.


5. Oil your hands and divide dough in 3 equal parts... shape the dough in 3 balls.

6. Place each dough ball on it's own parchment paper( you will need the parchment paper to help you place the dough in the baking dish...) and lightly cover with an oiled plastic wrap.

7. Allow to proof for 2 hours...

8. After 1 1/2 hours of proofing time, place 3 Corningware casserole dishes(with lids) in oven( big enough to allow the bread to rise inside when baking)....and pre-heat oven to 475 for 30 minutes.... the Corningware is in the oven during the preheating of the oven...the full 30 minutes.

9. After 2 hours of proofing(and 30 minutes of preheating) slash the loaves( 1/2 in deep)... you can make one slash in the middle or 2 as I have done.

10.Using oven mitts, remove the corningware from the oven. Remove lid and place proofed bread loaves(along with the parchment paper) in each of the 3 Corningwares. Cover with lids and place in hot oven.

Decrease oven to 450 Degs F
11. Bake loaves for 30 minutes. Remove lids and bake for an additional 10-15 minutes...or until the inside of the bread registers about 205-210 Deg F. You may need to cover the top with aluminum foil to prevent the loaves from burning.

12. Allow bread to cool completely(preferably 1- 2 hours) before slicing... Wrap well and freeze, if you like.

Thứ Tư, 30 tháng 3, 2011

Flourless Bread with NO Sugar made with Flax, Seeds and Almonds...also known as Good Morning Bread

.
.

Flourless Bread with NO Sugar made with Flax, Seeds, Almonds, and Coconut....also known as Good Morning Bread.
When I came upon this recipe, I stopped a bit and thought, "Wow, what a pretty neat bread!" I stared at the recipe wondering, could this actually be a bread that would eventually make it in the bread basket? Ok, so I really meant,... could this be a healthy bread that would actually be tasty too? I looked at the ingredients again and loved everything about it. Loved the flax seeds and all the nuts that went into it...but would the bread be able to hold together without crumbling? I looked at the fabulous picture again...without a doubt I knew I wanted to make it. I decided it was worth trying, just because it would be a great bread to have on hand....if it would taste good:). That afternoon, I decided I could just try one batch and see how the bread would taste... deciding to slightly change the original recipe a bit. Well, the bread far exceeded my expectation....it was wonderful!
Flax is very nutritious ...offering many health benefits. Ideally consuming raw flax seeds is the way to go, but incorporating some of the flax into baked goods will also deliver nutritional value. Flax provides us with vitamins, protein, fiber, lignans, and other nutrients that are wonderful for the body...and I think it also aids in losing weight:).
I am excited to share this recipe with you, as I loved the bread and found it quite delicious. It is a great bread to make especially for those who have wheat allergies... and for those who cannot have sugar in their diet. Even though I do not have a wheat or sugar restriction, I could eat this bread... almost every day( though a slice or two will be plenty:).
Truly amazed with the final product...give it a try and let me know what you think. Now, I don't exactly think the oat bran is crucial...in case you can't find it( but then again, I haven't tried it without). I also think that instead of using all almonds, you can add a mixture... hazelnuts sound great, as do walnuts and pecans. I would love to try it again... maybe decreasing the amount of eggs and adding a bit more water... or changing the amount of butter, or even using different oils. I am not sure how all those changes will affect the taste or texture...however, I do know the version I am posting was just great. I've even had requests for the recipe:)! Feel free to check out the original recipe. Hope you enjoy...

Tip: Let the bread cool completely and use a sharp serrated knife to cut slices...the bread may crumble a tiny bit, but should hold together for the most part.

You will need: adapted from Palachinka...entitled Good Morning Bread

Soak for 5 minutes:
2 TBS oat bran
7 TBS water

Process:
1 scant cup raw sunflower seeds
1 scant cup raw almonds
1/2 cup flax seeds
1/2 cup shredded unsweetened coconut
1 tsp kosher salt (or a bit less, if you like)
1/8 tsp cinnamon( or just a pinch)

Add and thoroughly combine with ground nuts:
4 eggs, lightly beaten
5 TBS butter, softened
2 TBS light olive oil

Stir in batter:
1/3 cup sunflower seeds

Sprinkle with: optional
sesame seeds
poppy seeds
sunflower seeds

Directions:
1. Preheat oven to 338deg F....or you can lower to 325 deg F, if you like...baking time might change a bit.
2. Soak oat bran in water for 5 minutes. Set aside
3. In a food processor, add sunflower seeds(scant cup) almonds, flax seeds,, coconut, salt and cinnamon. Process until fine crumbs.
4. Remove mixture in a bowl and add the soaked bran, eggs, softened butter, and oil. Mix to thoroughly combine. You should have a thick-ish batter.


5. Line a rimmed cookie sheet with parchment paper and pour batter in the center. With wet hands form batter in a round "boule" shape....I am sure you can make it oblong if you like:).
6. Bake for 45 minutes...you may see a bit of the butter "oozing" around the edge(it is o.k. it will eventually disappear:).
Cool completely before cutting. Refrigerate for up to 2-3 days or freeze.


Thứ Tư, 2 tháng 3, 2011

Homemade Wheat Thin Crackers...King Arthur Flour

..
Homemade Wheat Thin Crackers...King Arthur Flour
I am so glad I stumbled upon this recipe recently. Homemade Wheat Thins... I simply knew I had to make them. I just love homemade crackers, and hardly ever buy crackers anymore. I've made quite a few different crackers in the past... and some some have become real favorites. But I hadn't yet made this version of crackers that uses 100% whole grains...homemade Wheat Thins.
Crackers, in general, don't require a ton of ingredients, and I quickly noticed I had everything in the house to make them. I had some spelt flour as well, so I decided to make a double batch using some whole grain spelt flour for one and 100% whole wheat for the other batch. The spelt flour version was easier to roll out as the dough was slightly softer, and resulting crackers were probably a bit more tender as well. But both versions were fantastic! Crispy, yet tender and sightly sweet with a hint of vanilla. I think they even tasted like the Wheat Thins...only better:).
King Arthur Flour has really come up with a winner of a recipe! Definitely a favorite in our house...
I noticed that the crackers were incredibly delicious rolled very thin...close to 1/16th of an inch. But they are just as delicious when rolled just a bit thicker(1/8th or so)....just need to bake them a bit longer. You definitely don't want them too thick.... as they really are at their best when rolled thin. I guess that's why they are called, Wheat Thins:).
The crackers do crisp up as they cool, but in case you feel they aren't crispy enough, you can opt to place them back in the hot oven after you've baked all the batches. Just turn the heat off and let them crisp up a bit more with the residual heat....do look after them.
I really liked these crackers and kept talking about them for days:). If you have some time, and want to try the crackers, I highly recommend them. I think the yield is close to 8 oz (or so)....for one batch...Glad I made a couple of batches:), but I did end up making a couple more batches later on during the week:)...even a soaked wheat variation using whey for the liquid. Hope you enjoy...
Note: The crackers stay crisp for days in an airtight container...
Also, I have tried substituting oil for the butter...definitely NOT the same taste.

You will need: initially inspired by Tracey's Culinary Adventures and adapted from King Arthur Whole Grain Baking

1 ¼ cup( 5 oz) whole wheat flour*
1 ½ TBS sugar(or honey)
½ tsp. salt
¼ tsp. paprika
4 TBS butter, cut up
¼ cup water
¼ tsp. vanilla
salt for topping( optional, I skipped)
* you can also use whole grain spelt flour... I absolutely LOVED the spelt flour variation, and probably preferred it.
If you do not have a scale, you might want to use about 1 cup+ 2TBS whole wheat flour and then add the other 2 TBS at the end... only if the dough needs it. You don't want the dough to be stiff...it'll be harder to roll them thinly. I noticed my whole wheat version was harder to roll than the spelt flour variation....probably because I didn't weigh it:). The spelt dough was softer in texture (not by too much)... the rolling was a breeze.

Directions:
PREHEAT OVEN TO 400 deg F.
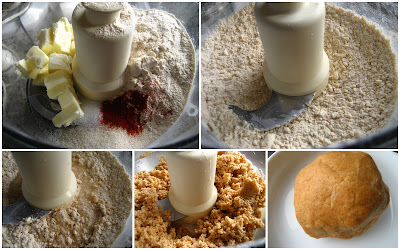
1. In a processor bowl(or mixing bowl if doing by hand), combine the whole wheat flour, sugar, salt, paprika and butter.
2. Pulse for a few times until you get fine crumbs...no bigger than a pea(if doing by hand, use a pastry blender to cut in the butter).
3. Combine water and vanilla and pour over dry mixture( if using honey, and not sugar, you can add it with the water).
4. Process again for a few seconds until everything is evenly combined... or mix well by hand. You should be able to form a smooth dough....sort of like a play dough consistency. Try not to mix it too much...the crackers won't be as tender
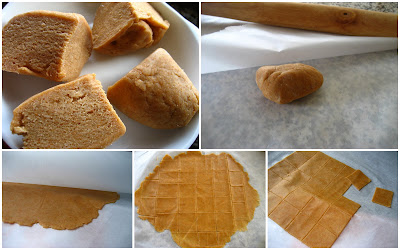
5. Form into a ball and cut into 4 pieces...cutting them in 4 pieces will help you work with a small amount of dough so that you can roll the dough as thinly as possible. Cover the rest of the dough as you work...so as not to dry out.
6. Take one piece of dough and place between parchment paper. Roll dough as thinly as possible close to 1/16-1/8th inch. Lift the top parchment paper and reposition it to evenly roll out the dough... You can also remove the top parchment paper after you've rolled the dough out a bit and then just continue to roll the dough out on the bottom parchment....till you get it thin enough. You can slightly wet your countertop before placing the parchment paper on it so it won't slide too much on you as you roll....but I deal with the sliding:).
OR
Roll the dough out, however it seems easier for you: suggestions below or use your own
  • on a lightly floured counter top
  • lightly greased back of a cookie sheet
  • directly on a pizza stone
  • on a silpat
7. Cut crackers using a sharp knife...about 1 1/2 inches square. If you want "perfect" squares, trim edges and re-roll scraps once.
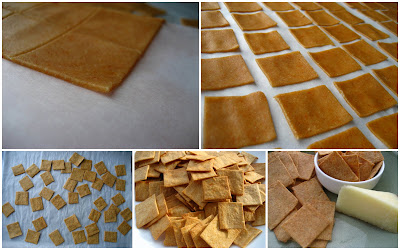
8. You can place crackers on a parchment paper... or if you've rolled it out on a parchment paper, just slide it onto a cookie sheet parchment and all. The crackers don't spread much. Sprinkle the squares lightly with kosher salt...I didn't. Repeat with the remaining pieces of dough.
9. Bake crackers until crisp and browned 5-7 minutes( depending on thickness)... remove the thinner crackers that brown too quickly and bake the remaining crackers. Do watch them closely, as they can burn quickly.
You want the crackers to be almost crispy, golden brown when removing them.... they will crisp up a bit more as they cool on the cookie sheets.
10. Remove the crackers from oven and cool in the pan...this will crisp them up even more. These crackers will stay crisp for days...loved that about them.
Best stored in airtight containers.

LOVE, LOVED, LOVED these crackers...

Thứ Tư, 1 tháng 9, 2010

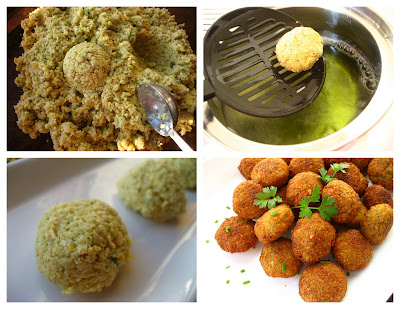
Israeli Falafel...Gluten-Free

.
Israeli Falafel...Gluten-Free. Sometimes I like to make a meatless meal. But when opting for that choice, I like to bring in a ton of flavor to compensate for the lack of meat. Falafel is a great choice.. it is meatless, yet it doesn't sacrifice on flavor.
This time around, I decided to make some falafel at home. As much as I try to avoid deep frying, I find that making a good falafel leaves you with no other option than to deep fry. Believe me, I tried baking the falafels. The baked version wasn't necessarily bad, they were just a bit more"gummy". I also found them to be a bit more dense....probably due to the fact that they didn't rise or puff up very much. The deep fried version was lighter in texture and puffed up a bit. I was glad that the falafels didn't absorb very much oil~ as they weren't greasy at all.
In order to save on oil, I use a small pot to deep fry. The smaller the diameter of the pot the less oil I need to use. I cook about 5 falafels at a time, and this works very well for me. This way I don't waste oil. I especially like to use grapeseed oil to do my deep frying... grapeseed oil can be quite expensive, so using a smaller pot helps tremendously. I also like to make a larger batch of falafel, which I freeze for later. I will usually re-heat the falafels in the toaster oven. Ideally, the falafels are best eaten hot, right after they are fried. The trick to not having the falafel break apart on you while frying, is to process the mixture until fine....sort of like coarse sand with bigger bits of chickpeas scattered throughout(that's the best explanation I can give). If the texture of the falafel mixture is too coarse, it will not hold together....and thus breaking apart on you during frying. Some people say to add flour....that it helps to bind the mixture. In my case, I found it not necessary. They fried beautifully.
If you would like to see a video clip on how the falafels are made, you can watch this VIDEO. Also, I think it is important to use dried chickpeas that have been soaked overnight to get the right texture. Personally, I wouldn't use canned chickpeas. The falafels are best stuffed in a pita bread with your favorite condiments. You can use chopped tomatoes, onion, sauerkraut, pickled turnips/radish, lettuce, etc...Drizzle a bit of tahini and some yoghurt and you have a wonderful meatless sandwich that is full of flavor. This is one of the sandwiches I made using the pickled carrots/radish I posted earlier Hope you enjoy....

You will need: inspired by Epicurious...makes about 30-40 falafels depending on size.
16 oz(1 lb or 2 3/4 cups) dried chickpeas
2 cups diced onion
3-4 garlic cloves
2 tsps baking powder
2 tsps cumin
1 tsp coriander, ground
2 1/2 tsp kosher salt( or to taste)
2-3 tsps chile flakes (or to taste)
1/2- 1 cup loosely packed cilantro (or to taste)

Condiments: can include any or some of the following
Chopped onion,
Chopped tomato
sauerkraut
tahini
yoghurt
cilantro leaves
lettuce

Directions:
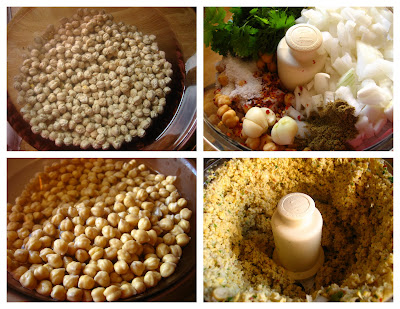
Place dried chickpeas in a large bowl.
Cover with plenty of water....about 2 inches above the chickpeas.
Place in refrigerator overnight.
Drain chickpeas well. They should have swelled up doubled in size at least.
In a bowl of a food processor, add the soaked chickpeas and the rest of the ingredients.
Process till fine...stopping and scraping the sides if need be. You don't want a complete paste but neither do you want the mixture to be coarse. You want to err on the finer side rather than too course. If it is too coarse, the falafel will disintegrate and not hold together when you fry them.
You should be able to scoop out a a TBS and see the indentation in the mixture. The falafel mixture will be moist. Refrigerate the mixture for a 1-2 hours. Take falafel mixture out from the refrigerator and form balls...with a light hand. Fry a few falafel at a time in hot oil(350 deg or so) till nicely golden brown. I do not like to waste too much oil...so when I fry, I use a smaller pot.
Serve falafel hot.
Place falafel inside a pita bread and add some garnishes/condiments to include any or all of the following: chopped onion, tomato, pickled radish/or sauerkraut, tahini, yoghurt, cilantro leaves, etc.

Thứ Hai, 8 tháng 3, 2010

Healthier Banana Muffins

Healthier Banana Muffins This recipe was inspired by the Starbucks Banana Bread recipe . As promised...a while back, I am now sharing the "healthier version" of the banana bread. I opted to make them into muffins instead, and ended up using some frozen bananas that had been sitting in my freezer. They really needed to be used up. Since we really liked the Starbucks Banana Bread, I immediately thought of making a healthier version. I have been trying to substitute ground oatmeal for some of the white flour in my recipes. I even substituted some of the white flour in my Naan Bread with some oatmeal flour and it was wonderful. I figured some oatmeal flour would go well in this recipe as well. Would the muffins work?... I really did not know. I played around a bit with the ingredients. I added a bit of baking powder to "fluff" them up a bit. I figured that all the heavy whole wheat/oatmeal flour would need some help. I didn't want the muffins to be dense. I also substituted honey for all of the white sugar. I ended up using only 1/2 cup of honey. These muffins weren't very sweet... I thought they were just right. But you might want to add a bit more honey. I also added some almond flavor and some lemon peel. We really liked it that way. Feel free to omit it if you don't like it...and stick with vanilla. You know, this was a great little recipe that I will be making again. I am glad they came out. So this post is for those of you who would like to try a healthier muffin. Hope you enjoy....
You will need:
1 cup whole wheat flour
1 cup ground oatmeal flour( I usually use my Vitamix to grind regular(not instant) oatmeal)
1 tsp baking soda
1/4 tsp baking powder
a pinch of salt
1 tsp lemon peel
1/2 cup honey
1 egg
1/2 cup oil
2 TBS buttermilk
1 tsp almond extract/vanilla
3 ripe bananas, mashed
1/2 cup walnuts/pecans(either or ...or a mixture)
Topping:
1/3 cup chopped walnuts/pecans(either or...or a mixture)
Directions:
Pre-heat the oven to 325.˚
Blend together the flours, baking soda , baking powder, lemon peel and salt. Set aside.
Mix together the egg, honey and oil. Add the flour mixture and when blended add the buttermilk, vanilla and mashed bananas and mix until combined. Fold in 1 ⁄2 cup chopped walnuts/pecans.
Pour batter into prepared paper lined muffin pan. Top batter with remaining 1 ⁄3 cup chopped walnuts.
Bake for 18- 25 minutes, or until a toothpick inserted in the center comes out clean. I forgot to check the time:( Sorry...But, just check it...and keep an eye on it. Cool for 10 minutes on a wire rack before removing from pan.


Thứ Sáu, 22 tháng 1, 2010

Peter Reinhart’s 100 % Whole Wheat Sandwich Bread


Peter Reinhart’s 100 % Whole Wheat Sandwich Bread Ok, so I am in a bread baking mood as of late. I really have come to LOVE bread baking...and the more I bake, the better I get at it. Of course, I am still learning... I can still remember how scared I was of making bread. Actually, I avoided any recipe that listed yeast as an ingredient. I just didn't want to mess around with it....didn't want to be disappointed. So for the longest time, I stayed away from those little packets of yeast. I always figured it was meant for those who were professionals.... or like my mom, who always used yeast as if it was no big deal. My mom made wonderful pizza dough, cozonac, gogosi (Romanian version of doughnuts) and various other doughs. I would see her making the dough, adjusting amounts as she went along. She would add more flour if she felt the dough needed it, or maybe adjust the amount of liquid, and so on. So, when I first started using yeast, I wanted spectacular results...sort of like my mom's:). I mean, I wanted the final product to be perfect! Oh, believe me, it wasn't perfect by any means...but I slowly learned how the dough should feel. I also found out that certain factors can affect the final result ...such as the humidity on that particular day, the right temp. of the liquid(not too hot, not too cold) and the need for the dough to rise in a WARM environment. I also learned that properly mixing the dough was just as important. I started out kneading the dough by hand. That was fun ...for a while. But then my hand would get too tired ...and that wasn't fun. Even though I gained valuable experience kneading the dough by hand, I didn't want it to become a chore, or even worse, disliking it. I wanted to enjoy it. I was thrilled when my husband eventually bought me a Kitchen-Aid mixer. From then on, it was a piece of cake:)!! Well, almost...at least the kneading part was. I am still learning about bread baking to this day. I really like to try a different bread recipe every so often....it just helps me practice my bread making skills.
This post was inspired by Peter Reinhart, a genius at bread baking. Well, I consider him a genius because he came up with a 100% WHOLE WHEAT bread that's TASTY, FLUFFY and TENDER! It slices beautifully. 100% whole wheat?...yes! Trust me, this bread is really good....DELICIOUS! We love it, and the recipe is definitely a keeper. I originally saw this recipe HERE and took the challenge to make it myself. Ok, so the recipe may look long and tedious. It really does involve two days!...yes, two days. But, you really don't have to do too much. The dough just needs to rest and get hydrated. This in fact is what makes the bread so soft and tender vs. other 100% whole wheat breads. It also gets better flavor as it rests... and since I like to bring in whole grains into our diet, I was up for the challenge. The bread was fantastic. Worth the time. Of course, since I was going through all that trouble, I decided to make 2 loaves. Glad I did. Hope you enjoy...

YOU WILL NEED: Just a note, I did measure my ingredients using the scale this time around. I didn't need to adjust anything... Oh yes, I finally got a kitchen scale!:)

~~~~~~~~~~~STEP 1~~~~~~~~~~~~~

For the Biga (Pre-fermented Dough):
1 3/4 cups (227 grams)whole wheat flour
1/4 tsp instant yeast
3/4 cup (170 grams)water, at room temperature

Biga (Pre-fermented Dough) Directions:
1. Mix the biga ingredients until a shaggy ball of dough is formed. Knead the biga for about 2 minutes or until the ingredients are evenly distributed.
2. Place the biga in a bowl and cover.

3. Refrigerate for at least 8 hours and up to 3 days. Let the biga sit at room temperature for about 2 hours before using in the final dough.

~~~~~~~~~~~~STEP 2~~~~~~~~~~~~~~~

For the Soaker:
1 3/4 cups( 227 grams) whole wheat flour
1 tsp (4 grams) kosher salt
3/4 cup + 2 TBS (198 grams) whole milk

Soaker Directions:

1. Mix the soaker ingredients until evenly hydrated. Cover and leave at room temperature for 12 to 24 hours.


~~~~~~~~~~~~~STEP3~~~~~~~~~~~~~

Final Dough Formula:
all of the biga (Step 1), cut into small pieces
all of the soaker (Step 2), cut into small pieces
7 TBS (57 grams) whole wheat flour
1/2 TBS (5 grams) kosher salt
2 1/4 tsp (7 grams) instant yeast
2 1/4 TBS (43 grams) honey
1 TBS (14 grams) unsalted butter, melted

Final Dough Instructions:

1.Mix all of the ingredients until evenly incorporated.

2. Knead 8 to 10 minutes I kneaded mine for 8 using my Kitchen-Aid mixer

3. Rest 5 minutes.

4. Knead 1 minute to further strengthen the gluten.

5. Let rise for 45 to 60 minutes at room temperature, in a lightly oiled bowl, or until 1 1/2 times its size.


6. Shape loaf and place in a greased 8 1/2 x 4 1/2 loaf pan ( I like to use parchment paper on the bottom.).... you can also use a 9x5 loaf pan, though it probably won't get such a high rise. The smaller pan works a bit better.

7. Roll bread dough similarly to a jelly roll style.

8. Pinch the seam so that the dough won't unravel and place seam side down in a parchment lined(or greased) loaf pan/s.

9. Preheat Oven 425ºF/218ºC...you will only need to pre-heat the oven at 425 deg F.... you will bake the bread at 350 deg. F.

10. Final Proof: Let dough rise for 45 to 60 minutes, at room temperature, or until 1 1/2 times its size.

Before baking: Lower the oven temp immediately to 350 deg.
11. Place the loaf on the middle rack and bake for 20 minutes. Rotate pans and bake for another 20 minutes ( I like to loosely cover my loaves with aluminum foil to prevent overbrowning in the last 10 minutes or so). OR until the loaf is a rich brown on all sides and registers at least 195 deg.F in the center. I like to brush my bread with a bit with melted butter...that's why the loaf is so shiny. It won't stay shiny...just softens the crust a bit.


12. Transfer the bread to a cooling rack and allow it to cool for at least 1 hour before serving.
You can definitely freeze the bread....actually, I recommend it. Just wrap it well.

Thứ Ba, 18 tháng 8, 2009

Tabbouleh Salad...using bulgur or couscous


Using couscous...

Using bulgur...


Tabbouleh Salad...using bulgur or couscous. I love making this salad during the summer months. It is perfect if you have garden fresh tomatoes, cucumbers, scallions and herbs. But if you don't have a garden, don't worry... it is still delicious with some store bought vegetables and herbs. I got this recipe from my little mezze book. I made a few recipes and this is yet another great recipe. Amounts of herbs/seasoning can be adjusted according to taste. Lebanon and Syria both claim this salad as their own. But this salad has become popular all over the world. The Middle Eastern salads focus more on the herbs, while in the west the wheat is more dominant. I like the wheat to dominate, so I don't add too much parsley to mine. I also add cucumber...that of course is optional. You can skip it if you like. You can make this salad with either bulgur wheat or use couscous. The bulgur will take some time to absorb the liquids and get tender....whereas the couscous will become tender much quicker. This is definitely a refreshing salad, side dish or a complete meal. Serve it with some pita bread/naan and you have a vegetarian meal. I've included pictures of both the bulgur and the couscous...


You will need:
2/3 cup bulgur wheat, or couscous
3-4 TBS lemon juice, freshly squeezed
3-4 TBS extra virgin olive oil
2-4 TBS flat leaf parsley, shredded
1-2 TBS mint, shredded
4-6 scallions, finely chopped
2 Tomatoes, peeled,seeded and diced( I don't bother with peeling and seeding)
1/4 cup cucumber, diced ( I like to use the small Persian cucumbers)...optional
salt and pepper to taste
Directions:
Put the bulgur wheat or couscous in a fine strainer and rinse under very hot running water.
Showing you both the couscous and bulgur wheat.
Drain and put in a large mixing bowl. Add 3 TBS of lemon juice and olive oil enough to cover the grains ( I usually just add about 2-3 TBS olive oil and add about 1 -2 TBS of hot water to the bulgur. The couscous, I noticed, doesn't require any additional water)
Set aside for at least 1 hr until the grains absorb the liquid and become tender. Add the herbs, scallions,tomatoes, cucumber, salt and pepper.
Toss all the ingredients together.
Taste and adjust seasoning...add more oil/lemon juice, salt or pepper according to your preference. Serve immediately...or cover and refrigerate for later.
Tip: The longer the salad stands, the more oil/lemon juice it will absorb. Taste before serving to see if it needs moistening.