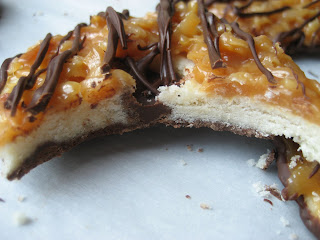


Girl Scout Samoa Cookies... I don't know if you have ever wanted to bake something so bad because of a picture you saw, because it looked so, so gooood to you. Well, I first saw this recipe on tastespotting a few months ago. It was featured by Once upon a plate, and she made the homemade Girl Scout Samoa Cookies that caught my eye.... an outstanding job with the presentation.
I have since then wanted to make them. They looked sooo goood that I had to try making them once at least. Mari from Once Upon a Plate actually credits BakingBites for the recipe. So, I in turn, thank both of them for the recipe! I suggest that you read the original recipe found on either of their blogs.
But I have a few tips that will make the cookies not so labor intensive... and to help a bit with the baking/asembling process. Just some things I've learned along the way. I know I will still try to improve on the aesthetics of my cookies so that they too will look somewhat professional.
I like to make recipes from scratch as close as I can... but this recipe does involve using store bought caramels. I think I will be in search of homemade caramels that I would like to use next time. For now though, I have opted to follow the recipe almost to the tee:)!
How were the cookies?....they were just too good....excellent!!! I had to put them in the freezer(in the back somewhere), so that we wouldn't eat more than our share! It was a lot of fun making these cookies. Hope you enjoy...
Cookie Ingredients:(Adapted from Baking Bites with a few alterations).Makes about 3 1/2-4 dozen cookies(original recipe)....I made mine a bit bigger and thus you get a few less.
Directions:
2. Mix in flour, baking powder and salt at a low speed, followed by the vanilla and milk, adding in the milk as needed to make the dough come together without being sticky (it’s possible you might not need to add milk at all). The dough should come together into a soft, not-too-sticky ball.
3. Add in a bit of extra flour if your dough is very sticky.
4. Place dough unto a plastic wrap and from into a log (about 2 inch in diameter)....
5. Refrigerate overnight or for a few hours until hard.

4. Place on a parchment lined baking sheet.
5. Bake for only about 10 minutes, until edges are lightly golden. Watch it though, mine took about 9 minutes. It all depends on your oven.
6. Cool for a few minutes on the baking sheet then transfer to a wire rack to cool completely.
Topping Ingredients:
Directions:
Preheat oven to 300 deg F
1. Spread coconut evenly on a parchment-lined baking sheet (preferably one with sides) and toast 20 minutes, stirring every 5 minutes, until coconut is golden. I noticed mine started to brown rather quickly after only 10 minutes, so I never kept them for the full 20 minutes. You don't want burned coconut!
2. Cool on baking sheet, stirring occasionally. Set aside.
7. Heat on high in the microwave in 45 second intervals, stirring thoroughly to prevent scorching.
8. Dip the base of each cookie into the chocolate and place on a clean piece of parchment paper.
9. Transfer all remaining chocolate (or melt a bit of additional chocolate, if necessary) into a piping bag or a ziploc bag with the corner snipped off and drizzle finished cookies with chocolate.
10. Let chocolate set completely before storing in an airtight container.


0 nhận xét:
Đăng nhận xét